 주얼리
주얼리 수트 액세서리
 여름 필수품
 우산
우산 가방 & 지갑

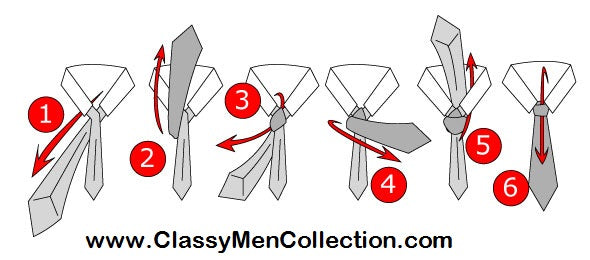
이 글은 "넥타이 매는 법"이라는 질문에 대한 완벽한 패션 가이드입니다. 이 글에서는 빠르고 쉽게 넥타이를 매는 방법과 멋스럽게 마무리하는 세 가지 방법을 알려드립니다. 넥타이 길이가 어느 정도가 적당한지 보여주는 시각적인 가이드도 추가했습니다.
엉성하게 묶인 넥타이는 누구도 보고 싶어 하지 않습니다. 저희는 여러분이 최대한 품격 있어 보이도록 도와드리겠습니다.
페이지 하단으로 스크롤하면 온라인에서 가장 저렴한 가격으로 최고 품질의 넥타이를 구매할 수 있습니다!
포인핸드 - 가장 일반적인 방법
빠르고 간단한 방법입니다.
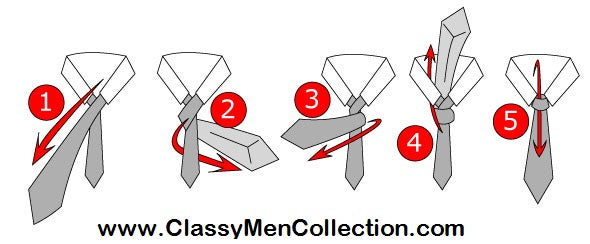
This is the quickest, simplest and most common way to tie a tie.
1. The good side of the tie facing forward, place the tie on your neck, so that both sides are on your front, the wide end hanging on your left side. Grab the wide (left) end and move it over the narrow (right) end.
2. Once you´ve crossed the different ends, move the wide end of the tie back to its original side by moving it under the narrow end.
3. Now continue the spinning motion by moving the wide end over the narrow end, exactly like you did in the first step, creating a loophole on the front of the tie for part 5.
4. Pull the wide end from under the neck loop all the way up so that it easily touches your nose.
5. Take the wide end and put it through the loophole you have created at the front of the tie. Pull it all the way down and tighten the knot.
To adjust the tie, grab the knot with your other hand and the narrow end of the tie with the other and adjust accordingly.
Here is a quick visual guide to making sure your tie length is correct:
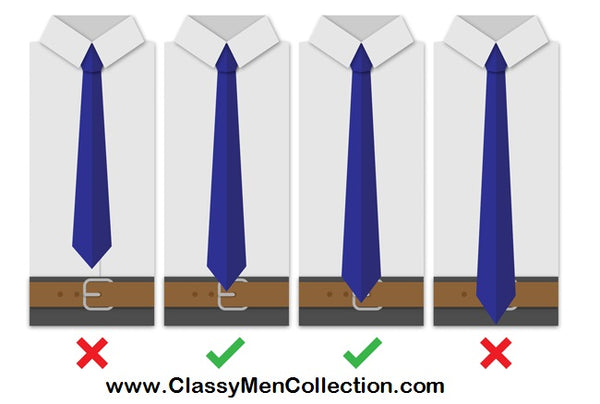
The lowest point of your tie should be around your belt height. Any taller or shorter than your belt height is considered to be "not on point". If you feel that your tie is too long or short to reach your belt, take the tie off and try tying it again with a different length of the cravat on your right side. It is highly unlikely that your tie is not of suitable length for you.
If you are looking for other ways to make a tie, keep reading. We will list a few lesser used, but still common, ways to answer your initial question, how to tie a tie.
Windsor Knot - The Symmetrical One
This one requires more steps to carry out than the four in hand. It provides excellent symmetry and a fairly large knot when done correctly. Follow the easy steps to make the perfect Windsor.
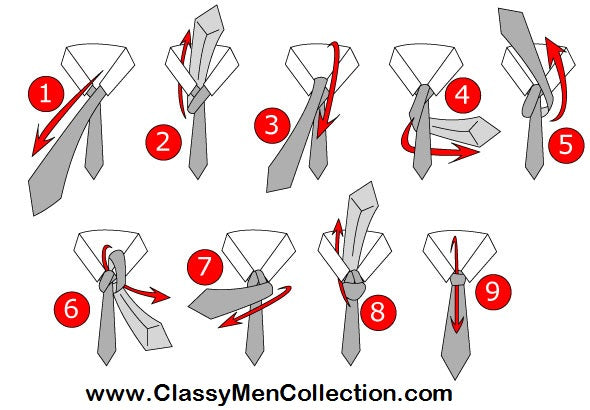
1. The good side of the tie facing forward, place the tie on your neck, both sides on your front and the wide end hanging on your left side. Grab the wide (left) end and move it over the narrow (right) end.
2. Pull the wide end up and through the loop.
3. Bring the wide end back down and to your right
4. Swing the wide end from right to your left side, beneath the narrow end.
5. Now lift the wide end up to the center, towards the neck loop.
6. Push it through the neck loop down to your left.
7. Move the wide end over the narrow end to your right side, creating a loophole for part 9.
8. Pull it up and through the neck loop.
9. Now finish the tie by bringing it back down and through the loophole.
Congratulations, you have successfully made a Windsor knot. Keep scrolling if you would like to see more variations.
Half Windsor Knot - The Average One
This one looks great and provides a bit less symmetry than a full Windsor. It also provides a slightly smaller knot. Half Windsor is a commonly known method and can get quite tricky to do properly. It is not fully symmetrical but still provides some symmetry. It isn" src="t easy. The knot is also fairly average size, hence the average one.
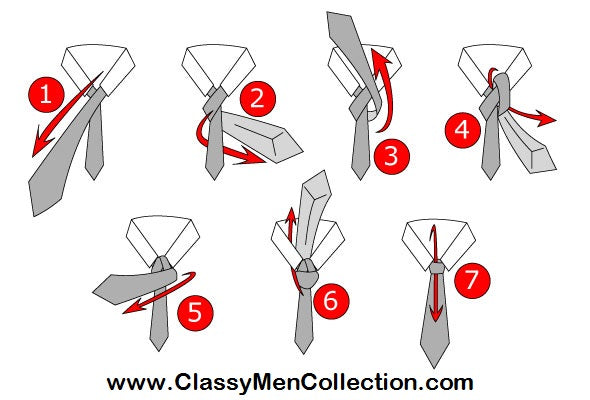
1. The good side of the tie facing forward, place the tie on your neck, both sides on your front and the wide end hanging on your left side. Grab the wide (left) end and move it over the narrow (right) end.
2. Once you have crossed both ends, move the wide end back to its original side by moving it under the narrow end.
3. Now lift the wide end up to the center, towards the neck loop.
4. Push it through the neck loop down to your left.
5. Swing the wide end over to your right side, creating a loophole for part 7.
6. Pull it all the way up through the neck loop.
7. Finish it by bringing the wide end down through the loop.
Congratulations, you have successfully made yourself a half Windsor knot. When done correctly, it should produce a nice dimple right in the middle of the tie just beneath the knot.
Pratt Knot (Shelby Knot) - The One With Two Names
This knot provides better symmetry than the half Windsor, but still not as symmetrical as the Windsor knot. It also has a bit smaller knot than the half Windsor. When done properly, you should see a dimple just below the knot.
1. The wrong side of the tie facing forward, place the tie on your neck, both sides on your front and the wide end hanging on your left side. Grab the wide end and move it, beneath the narrow end, to your right side.
2. Now bring the wide end up towards your chin.
3. Push it through the neck loop back to your right side.
4. Bring the wide end over the narrow end to your left side, creating a loop for part 6.
5. Pull it up and through the neck loop.
6. Finish the knot by bringing the wide end down through the loop.
At this point, you should have a beautiful, elegant pratt knot decorating your outfit. If this was easy for you, next try tying a tie without our instructions and complete all four knots.
With our instructions, you now should master the four most common ways to tie a knot. If you think that you can" style="float: none; margin-left: auto; margin-right: auto;">
이것은 넥타이를 매는 가장 빠르고 간단하며 일반적인 방법입니다.
1. 넥타이의 좋은 면이 앞쪽을 향하도록 목에 매어 양쪽 끝이 모두 앞쪽으로 오도록 하고, 넓은 쪽 끝이 왼쪽에 오도록 합니다. 넓은 쪽(왼쪽) 끝을 잡고 좁은 쪽(오른쪽) 끝 위로 넘깁니다.
2. 양쪽 끝이 교차되면 넓은 쪽 끝을 좁은 쪽 끝 아래로 넣어 원래 위치로 되돌립니다.
3. 이제 첫 번째 단계와 똑같이 넓은 쪽 끝을 좁은 쪽 끝 위로 넘겨 넥타이 앞쪽에 5번 단계를 위한 고리를 만듭니다.
4. 목 고리 아래에 있는 넓은 쪽 끝을 위로 완전히 당겨 코에 닿도록 합니다.
5. 넓은 쪽 끝을 잡고 넥타이 앞쪽에 만든 고리 안으로 넣습니다. 아래로 완전히 당겨 매듭을 조입니다.
넥타이를 조절하려면 한 손으로 매듭을 잡고 다른 손으로 넥타이의 좁은 끝부분을 잡고 적절히 조절하세요.
넥타이 길이가 올바른지 확인하는 간단한 시각적 가이드입니다.
넥타이의 가장 아랫부분이 벨트 높이 정도에 있어야 합니다. 벨트 높이보다 높거나 낮으면 "타이가 적절하지 않은" 것으로 간주됩니다.
넥타이 매는 다른 방법을 찾고 있다면 계속 읽어보세요. 넥타이 매는 방법에 대한 질문에 답하는 몇 가지 덜 알려드리지만 여전히 흔한 방법을 소개합니다.
윈저 매듭 - 대칭형
이 매듭은 네 가지 방법보다 단계가 더 많습니다. 하지만 제대로 매면 훌륭한 대칭을 이루고 꽤 큰 매듭이 됩니다.
1. 넥타이의 좋은 면이 앞쪽을 향하도록 목에 두르고, 양쪽 끝이 앞쪽으로 오도록 하며, 넓은 쪽 끝이 왼쪽으로 늘어지도록 합니다. 넓은 쪽(왼쪽) 끝을 잡고 좁은 쪽(오른쪽) 끝 위로 넘깁니다.
2. 넓은 쪽 끝을 위로 당겨 고리 안으로 통과시킵니다.
3. 넓은 쪽 끝을 다시 아래로 내려 오른쪽으로 넘깁니다.
1. 넥타이의 좋은 면이 앞쪽을 향하도록 하고, 양쪽이 앞쪽으로 오도록 넥타이를 목에 걸고 넓은 쪽 끝이 왼쪽으로 늘어지도록 합니다. 1. 넓은 쪽(왼쪽) 끝을 잡고 좁은 쪽(오른쪽) 끝 위로 넘깁니다. 2. 양쪽 끝이 교차되면 넓은 쪽 끝을 좁은 쪽 끝 아래로 옮겨 원래 위치로 되돌립니다. 3. 이제 넓은 쪽 끝을 목 고리 쪽으로 들어 올립니다. 4. 목 고리를 통해 왼쪽 아래로 밀어 넣습니다. 5. 넓은 쪽 끝을 오른쪽으로 돌려 7번 단계를 위한 구멍을 만듭니다. 6. 목 고리를 통해 완전히 위로 당겨 올립니다. 7. 마지막으로 넓은 쪽 끝을 고리 아래로 내려 마무리합니다. 축하합니다! 하프 윈저 매듭을 성공적으로 만들었습니다. 제대로 묶으면 매듭 바로 아래 넥타이 정중앙에 예쁜 움푹 들어간 부분이 생깁니다.
이제 저희 설명을 통해 가장 일반적인 네 가지 매듭 묶는 방법을 익히셨을 겁니다. 혹시 이 매듭들을 기억하기 어렵다면, 브라우저에 이 페이지를 즐겨찾기에 추가해 두세요. 언제든 평소에 사용하는 네 가지 매듭 외에 다른 매듭이 필요할 때가 있을 테니까요.
관련:
나에게 맞는 합리적인 가격의 고품질 넥타이 찾기
넥타이 매는 가장 일반적인 네 가지 방법을 소개합니다.
넥타이가 벨트에 닿기에는 너무 길거나 짧다고 느껴지면 넥타이를 풀고 오른쪽 크라바트 길이를 다르게 하여 다시 매보세요. 넥타이 길이가 적절하지 않은 경우는 거의 없습니다.
간단한 단계를 따라 완벽한 윈저 매듭을 만들어 보세요.
프랫 매듭(셸비 매듭) - 두 가지 이름을 가진 매듭
이 매듭은 하프 윈저 매듭보다 대칭성이 좋지만, 윈저 매듭만큼 대칭적이지는 않습니다. 또한 하프 윈저 매듭보다 매듭 크기가 약간 작습니다. 제대로 묶으면 매듭 바로 아래에 움푹 들어간 부분이 보입니다.
 { var scriptURL = 'https://sdks.shopifycdn.com/buy-button/latest/buy-button-storefront.min.js'; if (window.ShopifyBuy) { if (window.ShopifyBuy.UI) { ShopifyBuyInit(); } else { loadScript(); } } else { loadScript(); } function loadScript() { var script = document.createElement('script'); script.async = true; script.src = scriptURL; (document.getElementsByTagName('head')[0] || document.getElementsByTagName('body')[0]).appendChild(script); script.onload = ShopifyBuyInit; } function ShopifyBuyInit() { var client = ShopifyBuy.buildClient({ domain: 'classy-men-collection.myshopify.com', apiKey: '903434ce11d31ddc083c639d2c0f0815', appId: '6', }); ShopifyBuy.UI.onReady(client).then(function (ui) { ui.createComponent('collection', { id: 425647117, node: document.getElementById('collection-component-36db25d63a5'), moneyFormat: '%E2%82%AC%7B%7Bamount%7D%7D', options: { )
4. 5. 넓은 쪽 끝을 오른쪽에서 왼쪽으로, 좁은 쪽 끝 아래로 넘기세요. 6. 이제 넓은 쪽 끝을 목 고리 쪽으로 들어 올리세요. 7. 목 고리를 통해 왼쪽 아래로 밀어 넣으세요. 8. 넓은 쪽 끝을 좁은 쪽 끝 위로 오른쪽으로 옮겨 9번 단계를 위한 구멍을 만드세요. 9. 목 고리를 통해 위로 당겨 빼내세요. 9. 이제 매듭을 마무리하기 위해 매듭 끝을 다시 아래로 내려 구멍을 통과시키세요. 9. 윈저 매듭을 성공적으로 완성하셨습니다. 더 많은 변형을 보려면 아래로 스크롤하세요. 8. 하프 윈저 매듭 - 일반적인 매듭 8. 이 매듭은 보기 좋고, 전체 윈저 매듭보다 대칭이 약간 덜하지만 매듭 크기는 약간 더 작습니다. 하프 윈저 매듭은 흔히 알려진 매듭법이지만 제대로 하려면 꽤 까다로울 수 있습니다. 완전히 대칭은 아니지만 어느 정도 대칭을 이룹니다. 어렵지는 않지만 쉽지도 않습니다. 매듭 크기도 평균적인 편이라 '평균적인 매듭'>//
Related:
Find An Affordable Quality Tie For You
추천 글

오늘 가장 인기 있는 퍼플 넥타이 20가지

오늘날 남성용 인기 웨딩 넥타이 20가지
